webflow embed how-to tested
How to add an interactive 3D photo to Webflow (one photo, no layers)
Every "interactive image Webflow" tutorial wants Photoshop-cut layers and an Interactions rig. This one starts from a single photo and uses Webflow's Code Embed — about ten minutes, no code beyond one iframe. Tested on a free account: what's locked, what it costs, and the free-plan video route.
Aman Jha·September 17, 2026·updated September 18, 2026·10 min read
Every “interactive image Webflow” tutorial starts the same way: cut your photo into Photoshop layers, then build an Interactions rig that tilts them with the cursor. This guide skips both. You start from one photo, Gifsy estimates the depth and cuts the subject out, and Webflow gets a single Code Embed element. About ten minutes, no code beyond one iframe — and it is a photo, not a 3D model, so nothing needs modelling. One thing to know before you start: Code Embed is a paid-plan element; on a free site the route is a looping video instead (covered below). This is the Webflow chapter of the guide to interactive 3D photos for websites; the platform-agnostic version is the full iframe embed guide.
Quick answer: the 5 steps
- Make the 3D photo. Upload one photo at gifsy.fun/create, generate, and click Publish.
- Copy the embed snippet. One iframe, copied from the publish panel.
- Add a Code Embed in Webflow. Add panel → Elements → search "embed" → Code Embed → paste → Save & Close. Needs a paid site or workspace plan.
- Make it responsive. Width 100% and an aspect ratio on a wrapper, instead of the fixed 500 px height.
- Publish and check on a phone. Drag sideways to orbit; swipe to scroll.
What you need
- A Webflow site on a paid plan — or a paid Workspace. Checked on a free Starter workspace on 17 September 2026: the Code Embed element is greyed out in the Add panel with the tooltip “This element requires a paid site or account plan. Click the star icon to upgrade your plan.” It can't be dragged onto the canvas at all. Clicking the star opens the site's Plans page, which listed Basic at $15/month and Premium at $25/month (both billed yearly) as the paid Site plans; the Workspace plans page listed Core at $19/month and Growth at $49/month with “custom code on staged sites”, so a paid Workspace also unlocks it on a
.webflow.iostaging site without a Site plan. Prices change; the lock does not.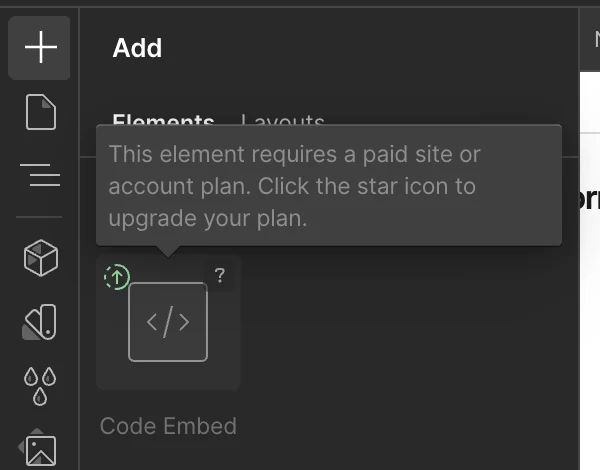
The Add panel on a free Starter site (19 September 2026). Code Embed is greyed out; hovering shows the plan tooltip. - A photo with one clear subject, at least 640 px on the long edge, with some background behind it. Frame-filling subjects and busy backgrounds separate poorly.
- A published Gifsy scene. 3D photos are free and unlimited with a free account, commercial use included, with a small badge on embeds.
Step 1 — Make the 3D photo and copy the embed code
Upload at gifsy.fun/create. Choose whether to keep the background or float the cut-out on transparency, adjust the depth if you like, and click Publish. The publish panel copies exactly this:
<iframe src="https://www.gifsy.fun/embed/<id>" style="width:100%;height:500px;border:0" loading="lazy"></iframe>src— the bare viewer page for your scene. No chrome.style— full width, a fixed 500 px tall. We replace the fixed height in step 3.loading="lazy"— defers loading until the visitor scrolls near. Remove it for a hero.
Add a title="Interactive 3D photo of …" for screen readers. The copied snippet doesn't include one yet.
Step 2 — Add a Code Embed in the Webflow Designer
- Open the page. Open the Add panel (the + top-left, or ⌘/Ctrl + E).
- Type “embed” in the search box, or scroll to Advanced. The element is called Code Embed (icon:
</>). Click it to insert it into the selected element, or drag it into the Section or Container where the scene should sit. - The Edit code modal opens (it also opens from the element's settings). Paste the iframe. Click Save & Close.
Webflow's own note applies here: scripts inside a Code Embed don't fully render until you publish, so preview on the staging address to see the scene running. The element takes up to 50,000 characters; the snippet is about 120.
Code Embed vs Page or Site custom code
Use the element: it has a position in the page flow. Page settings → Custom code → “Before </body>” is for scripts, and an iframe pasted there has no layout position. Never paste it into Site settings custom code. The 50,000-character limit on Code Embeds is irrelevant here — the snippet is about 120 characters.
Step 3 — Make it responsive (aspect ratio, not fixed height)
A fixed 500 px looks fine on a laptop and crops badly on a phone. Wrap the iframe and size the wrapper by aspect ratio instead. Paste this whole block into the Code Embed:
<style>
  .g3d { position: relative; width: 100%; aspect-ratio: 4 / 3; }
  .g3d iframe { position: absolute; inset: 0; width: 100%; height: 100%; border: 0; }
  @media (max-width: 767px) { .g3d { aspect-ratio: 4 / 5; } }
</style>
<div class="g3d">
  <iframe src="https://www.gifsy.fun/embed/<id>" title="Interactive 3D photo: …" loading="lazy"></iframe>
</div>
Match the ratio to the photo — 4/3 or 16/9 for landscape scenes, 3/4 for portrait — and change it at the phone breakpoint so the subject isn't a sliver. If you would rather do it in the Style panel: wrapper Div Block position: relative with an aspect ratio, iframe position: absolute, top/left 0, width and height 100%. On older builds without an aspect-ratio field, the classic trick is a wrapper with height: 0; padding-top: 75% (4/3) or 56.25% (16/9).
On the free plan: the same scene as a looping video
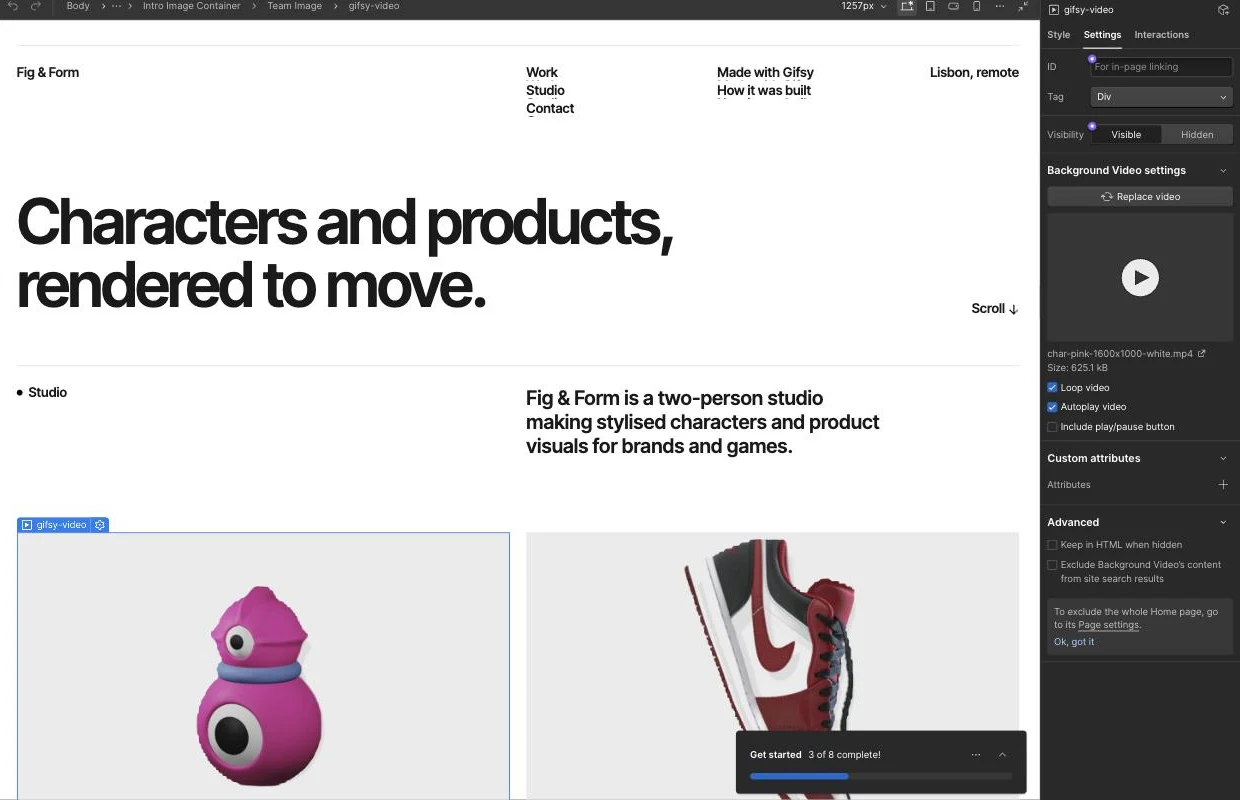
If you're on a Starter site and not ready to pay, you can still show the scene — just not the draggable version. Export a WebM clip of the orbit from the Gifsy workshop and use Webflow's Background Video element, which is available on the free plan. We built a studio-portfolio demo this way on a Starter site from a free marketplace template, swapping every image for a Gifsy render and no custom code: fig-form.webflow.io.
- In Gifsy, open your scene and export WebM (GIF works too, via an Image element, but it's heavier).
- Add panel → search “video” → Background Video (under Media). Click it to insert into the selected container.
- In the Background Video settings, click Upload video. Accepted: webm, mp4, mov, ogg, under 30 MB. Leave Loop video and Autoplay video on; turn off “Include play/pause button” if you don't want the round icon.
- Give the element a height in the Style panel (it has no intrinsic height — inside a grid it collapses to nothing). 320 px worked for a card; a hero wants a vh value (ours is 85vh).
Webflow re-encodes the upload to MP4 and WebM at 720 px tall (a 1600×1000 source became 1152×720), so anything sharper than that is wasted bytes; 1–3 MB opaque H.264 uploads looked identical after transcoding. Two things to know: Webflow auto-generates the poster from frame 0 and it comes back a shade greyer than the video (a pure-white background turned into a light-grey box until autoplay started), and Background Videos below the fold don't play until they scroll into view. Transparency doesn't survive the transcode, so export the scene on the same colour as your section rather than on alpha.
Two things we hit that no tutorial mentions:
- Webflow transcodes the upload. WebM or MP4 in, MP4 + WebM out at 720 px tall, served from Webflow's CDN — fine for playback, but don't expect the exact file you uploaded.
- The video can be invisible on a coloured section. Webflow's Background Video puts the
<video>atz-index: -100. If the element itself has no z-index, the section's background colour paints over the video and you get a blank box with a pause button — in the Designer and live. Fix: select the Background Video, Style panel → Position → set z-index to 1. The frame appears immediately.
Using it as a hero image
- Hero section
position: relative, a min-height of around 80vh. - Code Embed absolute, full-bleed,
z-index: 0. - Headline and CTA in a wrapper at
z-index: 1withpointer-events: none, andpointer-events: autoback on the button — otherwise the copy blocks the drag. - Drop
loading="lazy"— lazy loading is for frames below the viewport. - Keep the copy off the subject: left-aligned text over a subject that sits right of centre, or the reverse.
Performance — what the iframe actually loads
A server-rendered poster so something paints at once; a 1 KB manifest; the colour image as WebP (1440 px long edge, typically 150–350 KB); a lossless PNG depth map (tens of KB); the subject mask and inpainted backdrop when there is a subject; and the viewer script. All of it is edge-cached with a one-year immutable header. No video bytes, and the visitor never downloads an AI model — that ran once, when the scene was made. The scene runs in its own document, so it can't collide with your Webflow CSS.
Respect reduced motion (and a static fallback)
The scene auto-orbits gently until the first pointer move — unless the visitor's OS has prefers-reduced-motion on, in which case the viewer holds still and only moves under their own drag. On a copy-heavy page you can go further with the host-side fallback from the embed guide: hide the frame and show the scene's still image when the OS asks for less motion.
The other ways to get an interactive image in Webflow
| Method | Needs | Interactive how | Best for |
|---|---|---|---|
| Interactions “mouse move” + PNG layers | Cutting layers per photo in Photoshop or GIMP | Tilts with the cursor; no touch drag | You already have layered art and want zero third-party code |
| Webflow 2.5D with 3D transforms | Separated layers | Static unless you add Interactions | Illustration and UI compositions |
| Spline, model-viewer, Vectary | An actual 3D model; some are paid | Orbit a real mesh | Products and objects, not photos |
| Gifsy embed (Code Embed, paid plan) | One photo | Grab-to-orbit about ±20°, touch included | Portraits, hero photos, portfolio stills |
| Gifsy WebM in Background Video (free plan) | One photo | Loops; not interactive | The same scene on a Starter site |
To be fair to the first row: Interactions come with any paid plan and keep everything first-party.
Troubleshooting
The Code Embed is greyed out and won't drag
The plan gate. On a free site it can't be added at all; the star badge on the tile opens the Plans page. Use the Background Video route above, or upgrade the site or workspace.
The Embed shows a placeholder in the Designer
Normal. Publish, or open the staging address.
A Background Video is a blank box with a pause button
Give the element a z-index (Style → Position → z-index 1) and a height. See the free-plan section.
It is a fixed 500 px and crops on mobile
Step 3 — size by aspect ratio and change it at the phone breakpoint.
I can't drag it — the hero text is in the way
pointer-events: none on the text wrapper, auto on the button.
“Refused to frame” in the console
Your page's own Content-Security-Policy. Gifsy sets no framing restriction; add gifsy.fun to your frame-src.
The page feels slow
Lazy-load everything below the fold, keep one scene per screenful, and measure the transfer in DevTools.
FAQ
Can I add an interactive image to Webflow on the free plan?
Not the live, draggable version: on a free Starter site the Code Embed element is greyed out in the Add panel and can't even be dragged onto the canvas — Webflow's tooltip says it requires a paid site or account plan. What you can do on the free plan is show the same scene as a looping clip: export a WebM from Gifsy and drop it into Webflow's Background Video element, which is free.
Does Webflow support 3D images natively?
Webflow has 3D transforms and Interactions that can tilt separately cut layers, and it can host a model viewer. It cannot estimate depth from a single photo; that is what the Gifsy scene does before it reaches Webflow.
How do I make an iframe responsive in Webflow?
Wrap it in a Div Block with width 100% and an aspect ratio, and give the iframe position absolute, inset 0, width and height 100%. Set a different aspect ratio on the tablet and phone breakpoints so a landscape scene doesn't become a sliver on a phone.
Will an embedded 3D photo slow down my Webflow site?
The frame loads one WebP image, a small depth map, an optional mask and backdrop, and the viewer script — all edge-cached, no video, no AI. With loading="lazy" nothing loads until the visitor scrolls near it. Drop lazy loading only for a hero.
Does it work on mobile and touch?
Yes. A finger drag orbits the scene sideways; a vertical swipe scrolls the page as normal. The viewer does not use the gyroscope.
Can I use it in a Webflow CMS Collection page?
Yes. Put the Code Embed in the Collection page template, click Edit code, place the cursor inside the iframe's src where the scene id goes, click the purple dot on that line to open the connect menu, and pick a plain-text CMS field that holds each item's Gifsy scene id. Save & Close. The embed has to be inside a Collection list or on a Collection page for the field to appear.
Can I remove the "Made with Gifsy" badge?
Yes. Buy any 3D model credit pack (from $9) and the badge comes off all your embeds, including ones already published. On a free account every scene keeps a small badge inside the frame. Commercial use is allowed either way, so client sites are fine.
Is this the same as Webflow's parallax on scroll?
No. Scroll parallax moves whole elements at different speeds as the page scrolls. A 3D photo has per-pixel depth estimated from one photo, and the visitor orbits it by dragging — the subject separates from its own background.
Make a 3D photo from your own image. Related: the full iframe embed guide and the Framer version of this guide.