Free depth map generator — image to depth map, no sign-up
Gifsy's free depth map generator turns any image into a grayscale depth map online: white is near, black is far, made by Depth Anything V2 running in this tab. Download it as an 8-bit or 16-bit PNG. No sign-up, no watermark, and your photo is never uploaded.
Want the photo itself to move in 3D? Try the 3D photo maker
↑ Add a photo to begin.
How to make a depth map from a photo
Three steps, all in this tab. Nothing is uploaded and you don't need an account.
- 1
Add a photo
JPG, PNG or WebP. The first time, your browser downloads the depth model (about 50 MB) and keeps it for next time.
- 2
Pick the options
Sharpen edges is on by default. Turn on Invert if the app you're feeding wants white = far.
- 3
Download the PNG
16-bit for displacement and compositing, 8-bit when a tool only reads ordinary PNGs.
What you get
File
Grayscale PNG
White = near, black = far. Invert swaps them.
Size
Your photo's size, up to 2048 px
Upscaled from a 518 or 770 px working pass.
Depth
Relative, not metres
Stretched per image, nearest to farthest.
Cost
Free, no account
No watermark, no limit.
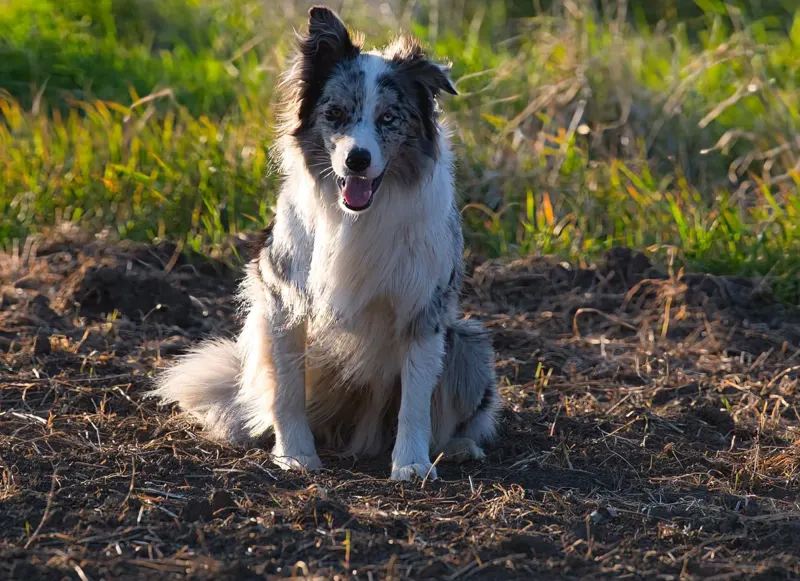
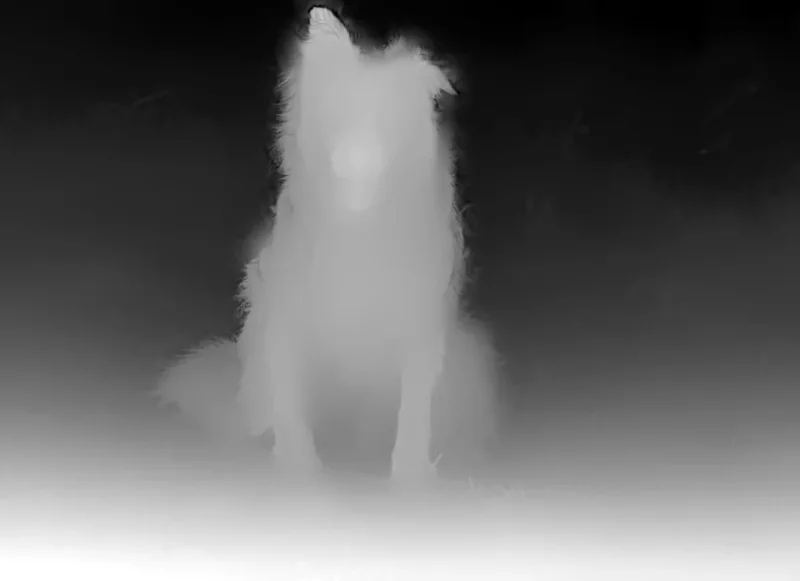
How to read a depth map
A depth map is a photo of distance: one grey value per pixel, bright for close things and dark for far ones. The catch is that the model only knows order, not metres. It can tell the cup is in front of the window. It can't tell you the cup is 40 cm away.
Brightest pixel
Nearest part of this photo
Darkest pixel
Farthest part of this photo
Mid grey
In between
An order, not a distance.
Two photos
Not comparable
Each map is stretched on its own.
Using a depth map in other apps
The usual trouble is which way round an app reads it. This tool gives white = near. Where an app wants the opposite, flip Invert before you download.
Blender
White = near. No invert.
Subdivide a plane, add a Displace modifier and set its texture to the PNG. Values above Midlevel push out along the direction you pick, so white areas rise toward a camera facing the plane. Use the 16-bit file.
Photoshop
Wants black = near. Turn on Invert.
Adobe's Lens Blur help says black in the depth map is the front of the photo and white is far away. Paste the inverted map into a new alpha channel, then choose that channel as the Lens Blur depth map source.
After Effects
Either way, set it in the effect.
Use the map as the Blur Map layer of Camera Lens Blur. Adobe says bright values get more blur by default; Blur Focal Distance picks the value that stays sharp, and Invert Blur Map flips the relationship.
ControlNet (depth)
White = near. No invert.
ControlNet's own depth preprocessor turns MiDaS output into an image without inverting it, and MiDaS predicts closer things as larger values, so its maps are white = near like this one. That preprocessor saves 8-bit images, so the 8-bit download matches it.
LightBurn (laser engraving)
White = near. No invert.
LightBurn's docs say darker pixels engrave deeper in 3D Sliced mode (galvo lasers only), so the background cuts deepest and the subject stays raised. LightBurn 2.1 and later read 16-bit depth maps.
Using something else? Check which way round it expects, and use Invert if the result comes out backwards (the far wall pushing toward you is the giveaway). Step by step: a depth map in Blender and a depth map for laser engraving.
8-bit or 16-bit PNG?
Depth comes out of the model as decimals. An 8-bit PNG has to round them to 256 greys; on a slope that shows up as terraces once you displace a mesh with it.
Height map from a photo
A height map and a depth map are the same picture read from different sides. Depth is how far each point is from the camera; height is how far it rises off a surface. Shoot straight at a relief and the two line up, so near means high. The PNG from this tool works as a height map for displacement, relief carving and terrain-style effects, with white as the highest point.
Scale
Relative
Highest point white, lowest black, stretched per photo.
Reads
Shape, not brightness
A dark object that is close still comes out high.
Camera angle
Matters
A floor shot at 45° becomes a slope in the map.
Not for
Tileable texture bumps
Texture tools usually build those from brightness.
Photos that make a good depth map
- Works well
- A clear subject in front of a background
- Scenes that recede: a street, a room, a table top
- Portraits, products, pets, food
- Well-lit photos at least 518 px on the long edge
- Trips the model up
- Mirrors and glossy reflections, read as a room behind the glass
- Windows and glass, where it guesses between pane and view
- Plain sky, which has no texture to measure
- Fine hair and fur edges, very dark photos, and flat artwork
The same rules decide how well a photo turns into 3D. More in best photos for a 3D effect.
Your photo is never uploaded — check it yourself
The model runs with ONNX Runtime Web (WebAssembly) inside this tab. Page-view analytics load as on any page, with no image data.
- 1
Open the Network tab
Developer tools (F12) → Network, then add a photo.
- 2
See what loads
The first time: the model from huggingface.co and ONNX Runtime from cdn.jsdelivr.net. After that, nothing new.
- 3
Look for your photo
No request carries it. The PNG you download is built in the tab.
Gifsy vs other depth map generators
Including where others go further: Dreamina offers 2K/4K output, kordu.tools offers colour maps, and the official Depth Anything demo also gives a 16-bit output. kordu runs in the browser too, so “no upload” isn't unique to Gifsy. The full list is in the depth map generators comparison.
From each tool's own page, checked 23 September 2026.
Questions
Is the depth map generator free?
Yes. No account, no watermark and no limit on how many depth maps you make. It is separate from Gifsy's 3D photo maker, which turns a photo into an interactive 3D scene you can embed: that one is free and unlimited with a free account.
Is my photo uploaded?
No. The model runs in your browser tab. The only large download is the model itself, about 50 MB from huggingface.co the first time, plus the ONNX Runtime files. No request carries your photo, and the PNG is built in the tab. You can check in your browser's Network tab.
Which model does it use?
Depth Anything V2 Small, released under the Apache-2.0 licence, in the fp16 ONNX export published by onnx-community on Hugging Face. It is the same model Gifsy's 3D photo maker uses, run here with ONNX Runtime Web.
Is white near or far, and is it in metres?
White is near and black is far; turn on Invert to swap them. The values are relative, not metres: each map is stretched so the nearest part of that photo is white and the farthest is black, ignoring the most extreme 0.5% at each end. A grey in one photo doesn't mean the same distance as that grey in another.
What resolution is the depth map?
The model works at 518 px on the long edge, or 770 px on devices with at least 8 GB of memory and 8 CPU cores. The PNG you download matches your photo's size up to 2048 px, so anything bigger than the working size is upscaled. Sharpen edges lines the depth edges up with the photo's own edges, but it doesn't invent detail the model never saw.
Should I download 8-bit or 16-bit?
16-bit for displacement, relief and compositing: 65,536 grey levels instead of 256, so surfaces don't come out as visible steps. 8-bit for tools that only read ordinary PNGs, or when file size matters more than smoothness.
Why is the first depth map slow?
The first run downloads the model (about 50 MB) and warms it up. After that your browser keeps the model, so the next photos only take the time to run it.
Can it make a 3D photo from the depth map?
Not on this page. This tool gives you the depth map as a file. Gifsy's 3D photo maker is a different tool: it separates the subject, builds a scene you can drag, and gives you an embed code, free and unlimited with a free account.
Want the photo to move?
A depth map is a file for other software. To turn a photo into an interactive 3D scene people can drag, with an embed code for your site, use the 3D photo maker. It's a separate tool, free and unlimited with a free account.
- Turn a photo into a 3D photoThe 3D photo maker: drag, share, embed.
- How 3D photos workDepth maps, mattes and two planes, explained.
- Best photos for a 3D effectWhat reads as depth, and what fails.
- How this tool worksDepth Anything V2 in the browser, and the 16-bit PNG.
- Depth map for laser engravingDarker engraves deeper, as LightBurn reads it.
- Depth map in Blender16-bit PNG, Non-Color, Displace modifier.